
Show That Pesky Light Who’s Boss. Hint: It’s You!
Jun 24 • 2020
When it comes to photography: GOOD 👏🏻 LIGHT 👏🏻 IS 👏🏻 EVERYTHING.
But of course, it just also happens to be one of the hardest things to master in food photography. 😭 Getting your lighting juuuust right can make a photo. And a photo without good light? THE WORST.
But today I’m here with ACTIONABLE TIPS to help you tame that pesky light! Read on for 5 tricks you can implement right now to ensure you have beautiful, cohesive light in every photo you take! 🔥
CLOUDY DAYS = NEW BEST FRIEND
If you can, try to only shoot on cloudy days. Cloudy days give you indirect light, AKA an incredibly easy and beautiful light for food photography. Shooting in indirect light creates soft shadows and nice glowy highlights (which we LOVE).
In Foodtography School we define indirect light as light that shines down from the sun and passes through some sort of filter (like a cloud). When light passes through a cloud it disperses it softly, giving your scene an even light throughout, with soft shadows and glowy highlights. Just like this:
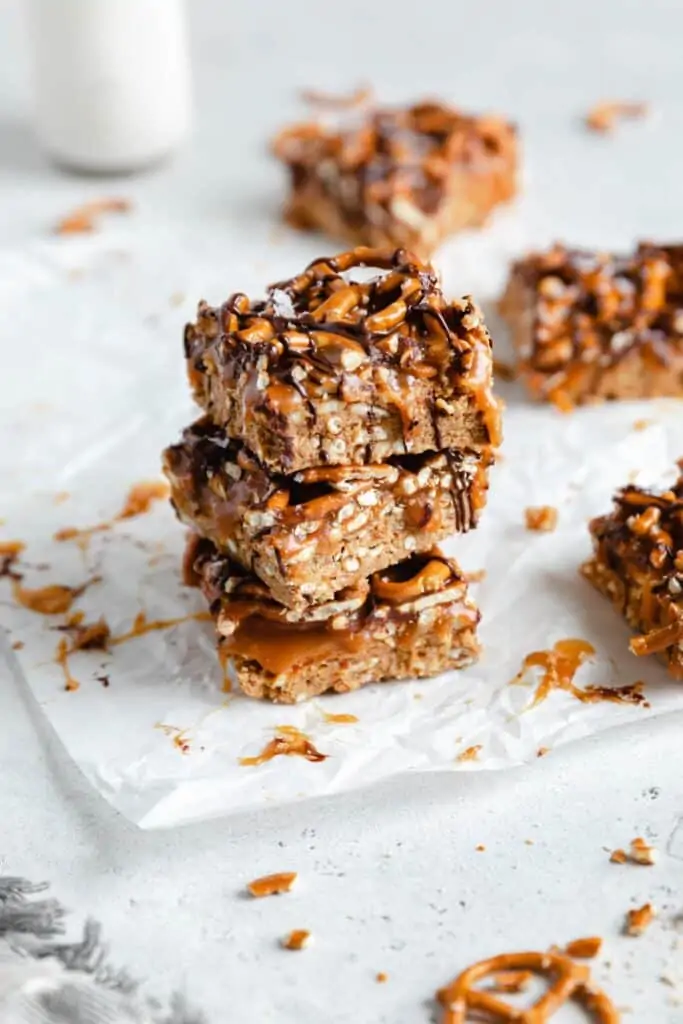
Notice how the shadows have a soft fall off (if you drew a line around them it would be hard to know exactly where they stop), and the highlights on the pretzels are shiny and white. These are hallmarks of indirect, cloudy light and make the photo look GORGEOUS.
SHOOTING WITH DIRECT LIGHT CAN BE HARDER!
Ok, so now that you know *why* indirect light is a great light to shoot in, it’s also equally important to know why direct light can be really tricky for food photography.
Direct light means there’s no buffer between the sunlight and what you’re photographing. It is very strong and will create harsh highlights and shadows within your scene. Like, if you’re shooting on a sunny day without a cloud in the sky you’ll oftentimes see an icky blue cast on your photos. That’s because the light is literally reflecting off of the blue sky and onto your scene.
This type of light can be hard to work with in the moment, and difficult to edit. That’s why if you’re looking for an easy-to-work-with, never-failing light, we always suggest, if possible, shooting in indirect light.

See the direct sunlight shining onto the hands in this photo, and how it creates strong, harsh lines? And can you see how the highlights seem almost blown out? That’s because the difference between the brightness of the highlights and shadows in direct light is big, so it can be harder to get a good exposure without your photo being either blown out or too dark.
BOUNCE THE HECK OUT OF THOSE BOARDS
Don’t be afraid to use bounce boards or a white foam core board (grab a couple from Michaels or Jo-Ann’s for cheapo-deapo) to brighten up your scene. Bounce boards aren’t just for taming shadows; they also help to add light back into your scene! If I’m dealing with really pesky light (I’m looking at YOU, small windows) I’ll even use two bounce boards.
Bonus: if you’re a visual learner like ME, you’re in luck because I created this behind the scenes vid where I literally *show* you how to implement some of these bounce board tips! Grab the vid, HERE.
USE THE 90°-180° RULE, BABY
Always shoot between 90°-180° relative to your light source. This will create a nice interplay between your shadows and highlights. If you shoot with your light source any more at your back, you’re completely limiting your shadows, which means you’re limiting the depth of your photo. Here’s what I mean—
Shooting 90° relative to your light source, like this:
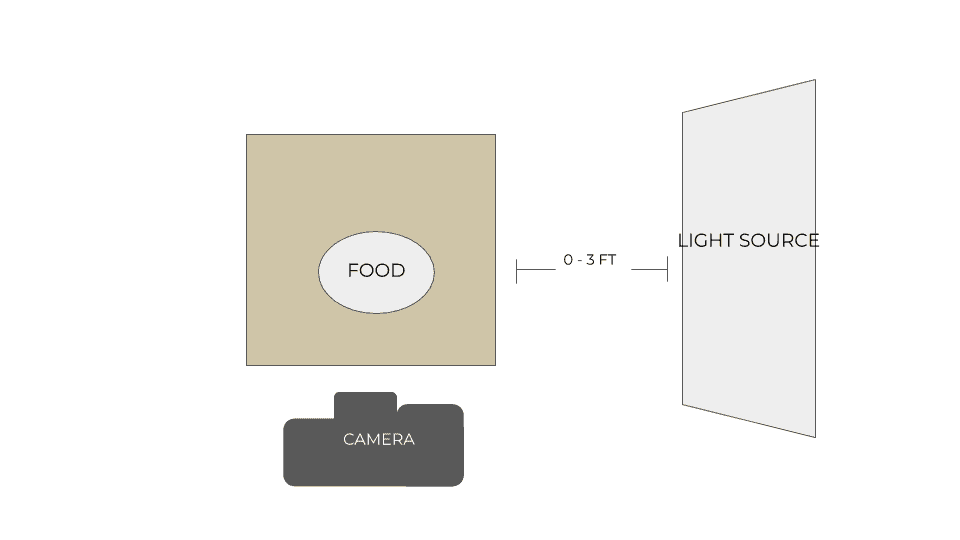
…gets you a photo like this:
See how the shadows are on the left side of the photo, and the highlights are on the right? This is shooting 90° relative to your light source!
180° relative to light source, like this:
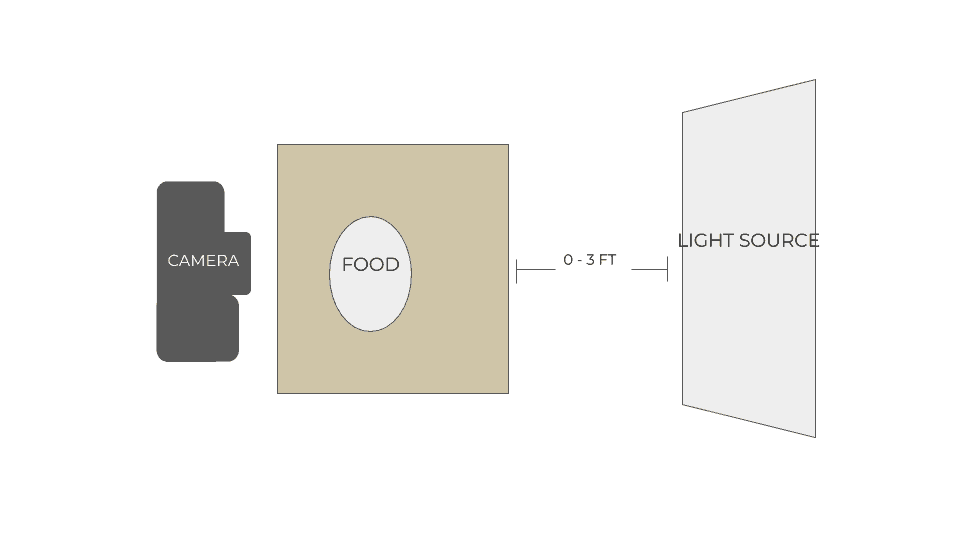
…gets you a photo like this:
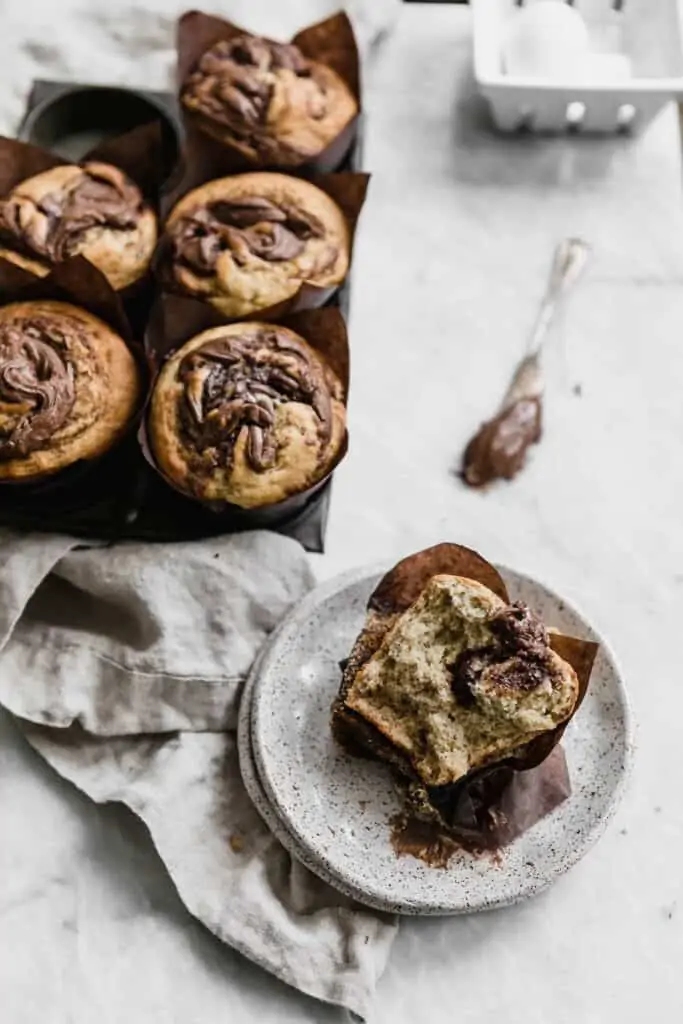
See how the muffins are “backlit,” with the highlights just skimming the top of the muffins? This is shooting 180° relative to your light source!
STANDARDIZE YOUR LIGHT
If you want your photos to look like they came out of the same studio you just have to standardize your light. Shoot at the same time of day. Only shoot on cloudy days. Shoot at the same angles relative to your light source (always have your light source on your right or always have it on your left). Experiment with different windows to find whichever one is best, and stick with that location. It’s annoying for sure, but this is a sure-fire way to make your photos look like they are all part of the same “world!”
…
Still feeling a little like aaaah, help!? Check out our FREE lighting tutorial and learn how to avoid some of the most common lighting mistakes when shooting food photography — and how to fix them!
And show ‘em who’s boss. 😎